Enabling Multi-Factor Authentication
in Azure Active Directory for Office 365 Users
TCM-KB-CLD-001
Last Updated: 6/27/2023
Multi-Factor Authentication
Active Directory
Contributor

Joe Helle
Chief Hacking Officer
Recent Blogs

AI Assisted Pentest Reporting
In this blog, we’ll show how to generate pentest finding templates with DeepSeek AI using MITRE’s Common Weakness Enumeration (CWE) categories.

AI-Automated Credential Stuffing
Credential stuffing remains one of the most efficient paths to account takeover, and AI assistance is changing the scale and effectiveness of those attacks.
OSINT Resources and Tools
Explore some of the fundamental domains of OSINT research, plus a list of tools and resources to develop this discipline as a cyber security professional.

Networking Fundamentals for Pentesters
We will take a look at networking concepts you should focus on, why they matter, and resources for learning for beginning pentesters without an IT background.
The PSAA: SOC Experience Certification
The PSAA certification is designed to give you knowledge and hands-on SOC experience, while signaling to employers that you can contribute on day one.
Issue
Users in your tenant do not currently have Multi-Factor Authentication enabled on accounts.
Requirements
- Premium P1 license in the tenant (at minimum)
- Account access with Global Administrator, Security Administrator, or Conditional Access Administrator permissions
- Azure AD Group for handling MFA users (MFA Users Group for example)
Recommended Remediation
The following outlines the recommended steps that the systems and network administrators should take in order to secure the environment.
Enabling Multi-Factor Authentication in Azure Active Directory (AAD) is straight forward. In order to do so, the subscription requires a Premium P1 license at minimum. First, access the Conditional Access menu by selecting Azure Active Directory -> Security -> Conditional Access.

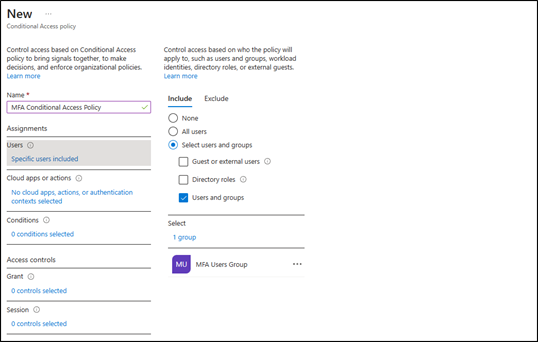
Select Create New Policy + (or New Policy in older deployments), to open the new conditional access policy creator. Fill out the Name box with the name of the new policy, and select the “Specific users included” link, select “Select users and groups,” find, click, and select the generated group for handling MFA access.
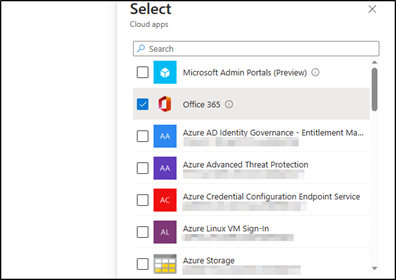
Under “Cloud apps or actions,” select the “No cloud apps, actions, or authentication contexts added” link. This opens a sub-menu, where you should select “Select apps,” and click the “None” link to open the app selection window.
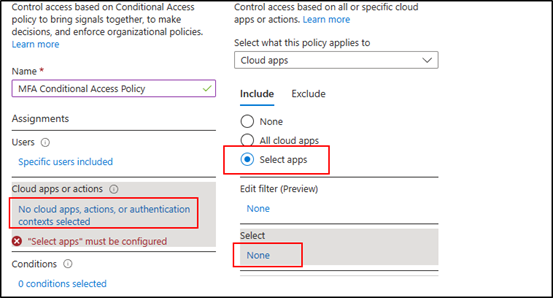
Find the Office365 option, select, and at the bottom, click Select again.
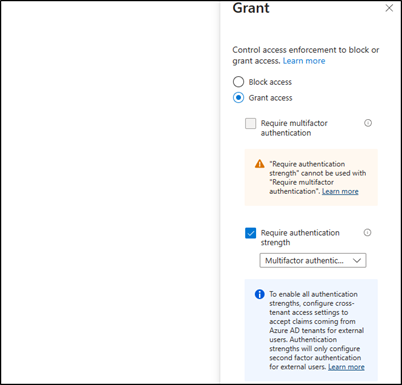
Click on the “0 controls selected” link under Grant to open the grant menu. Click on the “Grant access” radio button, and select the “Require authentication strength” option. The default Multifactor Authentication option works here.
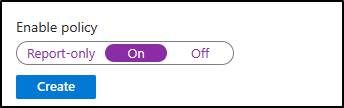
At the bottom of the page, ensure that Enable Policy is set to “On” and click create.
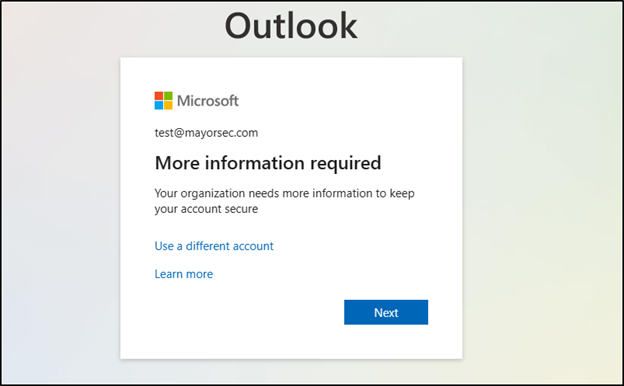
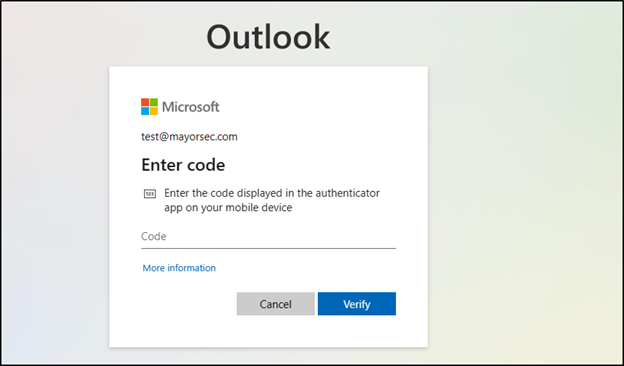
Once Azure returns the policy has been created, it’s important to test to ensure that it works. When you log into the account, you should be met with a message that says more information is needed.
If you have not implemented a specific, third-party authenticator application in the tenant, you can choose to either use the Microsoft Authenticator, or use a different authenticator.
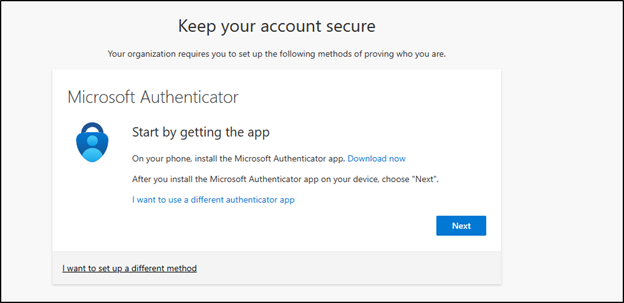
Follow the instructions provided by the choice you selected. Log out of the account, and then log back in. When you do, you should be met with a message that requires you to enter the MFA code before being logged in.
References
Tutorial: Secure user sign-in events with Azure AD Multi-Factor Authentication

See What We Can Do For You
Download a sample penetration test report to see the results we can deliver for your organization.
See How We Can Secure Your Assets
Let’s talk about how TCM Security can solve your cybersecurity needs. Give us a call, send us an e-mail, or fill out the contact form below to get started.